GigHive bee gighive

GigHive Music and Video Library

GigHive is an open-source deployment framework for hosting your own media library, a band’s library or fan videos, or even videos uploaded by guests from events like a wedding. There are two pieces to Gighive:

The automation spins up a fully reproducible environment using Docker, Ansible, and Terraform. It has a very simple interface: a splash page, a single database of stored videos and an upload utility.

This project is designed to be portable, easy to deploy, and suitable for local development or cloud environments (Azure supported out of the box).

Components

Software Prerequisites

Software needed for either option, Virtualbox or Azure:

For Virtualbox installations, Virtualbox will be the additional component installed. For Azure deployments, az and azure-cli will be installed.

Architecture (logical)

GigHive Architecture Diagram

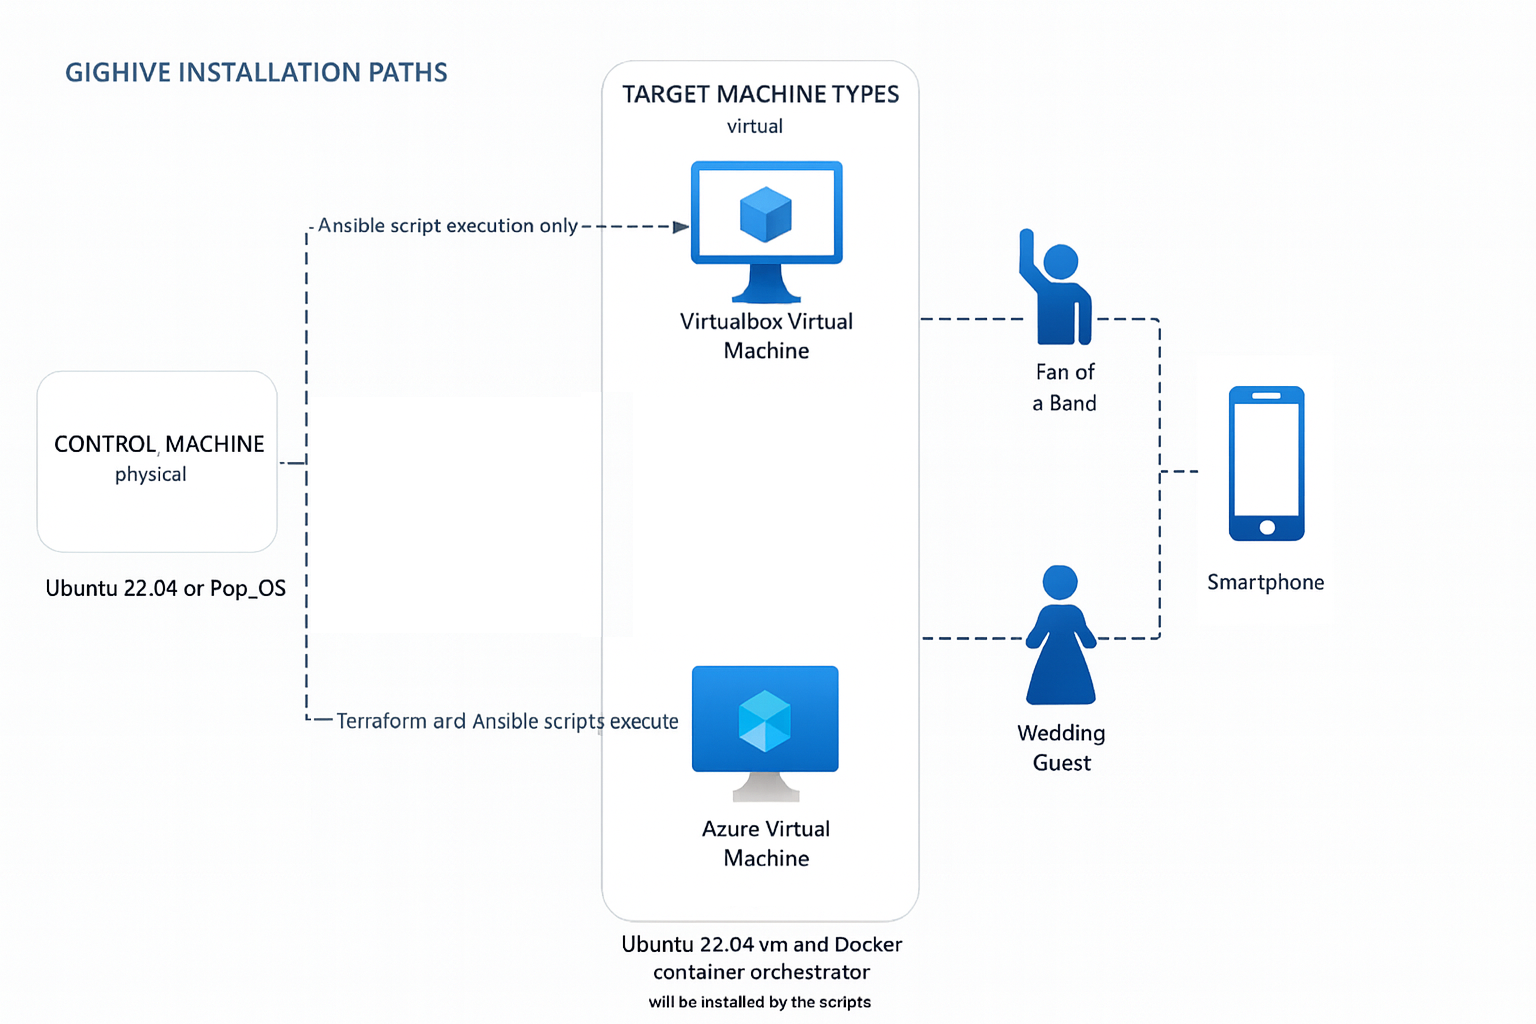
Click the diagram above to view full size

Suggested Platforms

Secrets and Default Passwords

GigHive ships with example credentials to make first-time setup fast and simple. These defaults are for local/demo use only and must be changed before any Internet-exposed or production deployment. You will see a step for this below.


⚙️ Prerequisites: Install Ansible and Python to your controller machine.

  1. Decide where you will install Ansible as the controller and what target vm (virtualbox or Azure) will be the Gighive server.
    • If you are going to install on a virtualbox VM, find an open IP address to use in your network.
    • If you are going to install to Azure, Azure will provision an IP for you.
    • In a later step, you will add that IP to the appropriate variable in the Ansible inventory file.
    • See Ansible core files discussion for more info on how Ansible’s configuration works .
  2. Log onto that server and install Ansible:
    sudo apt update && sudo apt install -y pipx python3-venv git
    pipx ensurepath
    
  3. Log out.

  4. Log back in and install Ansible.
    pipx install --include-deps ansible
    ansible --version # Should be 2.17.2 or higher
    
  5. Clone the repo from your desired location (usually /home/$USER).
    • The repo has some sample media files, so it’s about 690MB in size.
    • Takes a few minutes to download on an average connection.
      git clone https://github.com/gighive/gighive
      
  6. In whatever directory you have installed gighive, set the GIGHIVE_HOME variable and test to see if it’s correct.
    • Example: GIGHIVE_HOME is located in user’s home directory.
      export GIGHIVE_HOME=/home/$USER/gighive
      echo $GIGHIVE_HOME
      cd $GIGHIVE_HOME
      
  7. Add GIGHIVE_HOME export to your .bashrc.
    echo "export GIGHIVE_HOME=/home/$USER/gighive" >> ~/.bashrc
    cat ~/.bashrc
    
  8. Make sure you have id_rsa.pub in ./ssh for passwordless authentication.
    ssh-keygen -t rsa
    
  9. Update the secrets to your desired credentials. Copy the example file and then edit the destination to your liking:
    cd $GIGHIVE_HOME
    cp ansible/inventories/group_vars/gighive/secrets.example.yml ansible/inventories/group_vars/gighive/secrets.yml
    

⚙️ Option A: Gighive as a virtualbox VM. Install Gighive as a vm on your Ansible controller machine.

  1. From $GIGHIVE_HOME, Install Virtualbox using Ansible.
    • Default shown below is the virtualbox install.
    • install_virtualbox=true will be set in the below Ansible command.
    • The script will ask for your sudo password, so enter it in when prompted.
      cd $GIGHIVE_HOME
      ansible-playbook -i ansible/inventories/inventory_bootstrap.yml ansible/playbooks/install_controller.yml -e install_virtualbox=true -e install_terraform=false -e install_azure_cli=false --ask-become-pass
      
  2. When the script finishes, it will prompt you to reboot.
    • Hit “enter” to stop the script and then reboot.
  3. Verify the installation.
    cd $GIGHIVE_HOME
    ansible-playbook -i ansible/inventories/inventory_bootstrap.yml ansible/playbooks/verify_controller.yml  -e target_provider=vbox -e install_virtualbox=true -e install_terraform=false -e install_azure_cli=false
    
    • After finishing, you should see a green checkmark and the words “All prerequisites verified successfully!” at the bottom of the Ansible output. Otherwise, redo the steps above.
  4. In the inventory file below, set the “ansible_host” variable to the IP address to the IP address you decided upon in the Prerequisites.
    vi ansible/inventories/inventory_bootstrap.yml 
    
  5. Execute the Ansible playbook that will install Gighive.
    ansible-playbook -i ansible/inventories/inventory_bootstrap.yml ansible/playbooks/site.yml --ask-become-pass
    
  6. If the previous step ran without error, CONGRATULATIONS!! You’ve installed Gighive!! Now access it in a browser:
    https://<ansible_host IP from earlier step>
    

OPTIONAL: It is helpful to set an alias in your .bashrc to access the vm you’ve created so you can check it out.

alias gighive='ssh ubuntu@<ansible_host value found in ansible/inventories/inventory_bootstrap.yml>"

Option B: Gighive as an Azure VM. Install Gighive on Azure (requires an Azure subscription).

Make sure prerequisites from above are installed.

  1. Export Azure Vars (as noted at top of 2bootstrap.sh)
    export ARM_SUBSCRIPTION_ID=[put your subscription id here]
    export ARM_TENANT_ID=[put your tenant id/mgmt group id here]
    

    or, if you have azure.env configured with these exports, just:

    source ./azure.env
    
  2. Provision infrastructure. Run ./2bootstrap.sh. Watch for and respond to these prompts:
    • apply Terraform plan
    • update the ansible inventory file
    • run the ansible build
      ./2bootstrap.sh
      
  3. If Step 2 ran without error, CONGRATULATIONS!! You’ve installed Gighive!! Now access it in a browser:
    https://<ansible_host IP captured from the output of the install or the inventory file>
    

OPTIONAL: If you’re finished with the VM, delete all resources in Azure

cd $GIGHIVE_HOME;./3deleteAll.sh 

⚙️ Setup & Installation


📂 Repository Structure

├── 1prereqsInstall.sh
├── 2bootstrap.sh
├── 3deleteAll.sh
├── ansible
│   ├── inventories
│   │   ├── group_vars
│   │   ├── inventory_azure.yml
│   │   ├── inventory_azure.yml.j2
│   │   ├── inventory_baremetal.yml
│   │   └── inventory_virtualbox.yml
│   ├── playbooks
│   │   └── site.yml
│   ├── roles
│   │   ├── base
│   │   ├── blobfuse2
│   │   ├── cloud_init
│   │   ├── cloud_init_disable
│   │   ├── docker
│   │   ├── mysql_backup
│   │   ├── nfs_mount
│   │   ├── post_build_checks
│   │   ├── security_basic_auth
│   │   ├── security_owasp_crs
│   │   ├── validate_app
│   │   └── varscope
│   └── vdiLockedWriteDelete.sh
├── ansible.cfg
├── assets
│   ├── audio
│   └── video
├── azure.env
├── azure-prereqs.txt
├── CHANGELOG.md
├── docs
│   ├── index.html
│   ├── PREREQS.md
│   └── README.md
├── inventory.ini
├── terraform
│   └── variables.tf
└── tree.txt

License

GigHive is dual-licensed:


🤝 Contributing

Contributions welcome! Please open issues and pull requests.

👉 Contact us for commercial licensing or for any other questions regarding Gighive. GigHive bee mascot